WinZip Classic Configuration Options
Excerpted with permission from The Book of WinZip: File Compression and
Archive Management Made Easy, by Jerry Lee Ford (No Starch Press,
www.nostarch.com).
WHAT YOU'LL LEARN
In this chapter, you will:
- Configure default WinZip configuration options
- Manage archive file-type associations
- Configure the WinZip Classic toolbar
- Protect your archives with passwords
This chapter shows you how to configure WinZip and its many features. You'll learn how to tailor WinZip to work the way you want it to so that you can be as efficient as possible. For example, you'll learn how to customize the WinZip toolbar so that the features you use most often are always just a single click away.
You'll also learn how to configure external applications such as your antivirus program to work with WinZip so that you can work safely and securely, and how to secure files in your archives with password protection. By the time you are done with this chapter, you will know a lot more about WinZip and the way that it works.
In Chapter 3, "The WinZip Wizard," you learned how to configure the WinZip Wizard. This chapter provides similar instruction on configuring WinZip Classic.
To begin configuring WinZip Classic, select one of the configuration options from the Options menu on WinZip's main screen. Each option lets you configure a specific aspect of WinZip. These are the options available:
- Configuration. Provides access to most of WinZip's configuration options.
- Password. Lets you secure an archive with a password. (This option is available only if you have an archive open.)
- Sort. Lets you change the order in which files are displayed when viewing the archive's contents.
- Reuse WinZip Windows. Determines whether or not you can run two copies of WinZip at the same time.
- Save Settings on Exit. Tells WinZip to automatically save any unsaved configuration changes before closing.
- Save Settings Now. Tells WinZip to save configuration changes as soon as they are made.
- Set Installation Defaults. Restores WinZip's default configuration settings.
- View Last Output. Displays a log showing the results of the last WinZip operation. This option is available only when you have an open archive and have performed at least one operation on it such as adding a new file.
The Configuration Screen
Most of WinZip Classic's configuration options are located on the
Configuration screen, where everything is organized on six tabs, or
property sheets:
- View. Provides options for controlling WinZip Classic's appearance, including which columns will be shown.
- Toolbar. Allows you to customize the WinZip toolbar.
- Folders. Specifies the locations of default WinZip folders, including the Start-up, Extract, and Add folders.
- System. Configures the way WinZip and Windows work together.
- Program Locations. Allows you to configure other programs to work with WinZip, such as your virus scanner.
- Miscellaneous. Contains configuration options that do not fall into the other categories.
Controlling WinZip's Appearance with View
The View property sheet is divided into three sections, as shown in Figure
6-1. The Columns section allows you to specify the columns of information
that are displayed in the WinZip Classic main display area, including
Type, Modified, Size, and so on. As Figure 6-1 shows, not every column is
displayed by default (Type, CRC, and Attributes are unchecked) because
WinZip displays only those columns that are likely most important for you
to see. Check or uncheck any column to add or clear its selection, or
click the Defaults button to restore WinZip to its original column
selections.
The General section provides the following three options, which configure
how data is displayed and selected in the main WinZip display area:
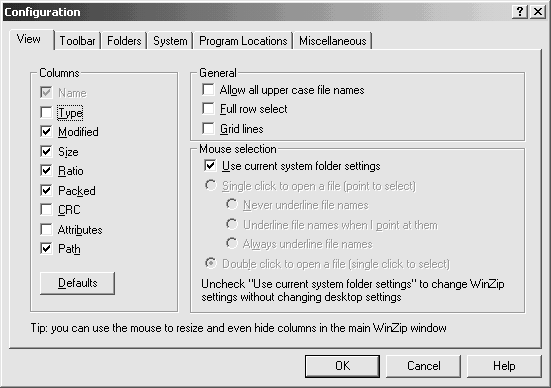
Figure 6 -1: Configuring the WinZip Classic display
- Allow all upper case file names. Tells WinZip to display file names without lowercase characters in all uppercase. Normally, WinZip capitalizes only the first letter of a file name.
- Full row select. By default, you can select files only by clicking in the Name column. This option lets you select a file by clicking in any column in the WinZip display area. Turning this option on can make WinZip Classic easier to work with by widening the selection area from just the file name to the entire row.
- Grid lines. Tells WinZip to overlay the display with a grid. Figure 6-2
shows how gridlines appear when configured for display. This option can
make it easier to examine the contents of large archives by organizing
their contents into a spreadsheet-like display.
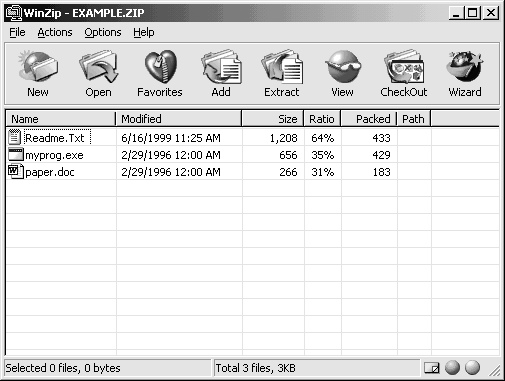
Figure 6 -2: Use gridlines to format the display of an archive's contents
The Mouse selection section lets you configure the behavior of your mouse when working with WinZip. By default, WinZip uses the Windows mouse settings, but you can change the way WinZip interprets single and double mouse clicks by using these options.
Adding and Removing Toolbar Icons
The Toolbar property sheet's six configuration options control the
appearance and behavior of the WinZip toolbar, as shown in Figure 6- 3.
- Use Explorer-style toolbar buttons. Replaces the default WinZip Classic toolbar with an Internet Explorer-style toolbar. This is the only Toolbar option that is disabled by default. You will probably find WinZip's default toolbar more attractive.
- Use large toolbar buttons. Tells WinZip to use large buttons on the WinZip Classic toolbar. Disabling this option provides a little more room for the display of archive contents but otherwise provides no major benefit.
- Show button text. Determines whether the name of the icon is displayed beneath its image; when this option is selected, labels are displayed.
- Show tool tips. Determines whether WinZip displays small pop-up messages describing the function of buttons when you pass your cursor over them. Tooltips are handy when you forget what an icon does. Just move the pointer over a button, and WinZip will explain its function.
- Use flat toolbar buttons. Replaces WinZip's 3D-style icons with two- dimensional icons. This option is designed to accommodate older computers with limited graphics capabilities.
- Use high color toolbar buttons when possible. Determines the color range
that WinZip is permitted to use when displaying icons. This option is
enabled by default, and disabling it may make your display less
attractive. (There's probably no need to uncheck either of the last two
options unless you're using a really old machine with a really old
monitor.)
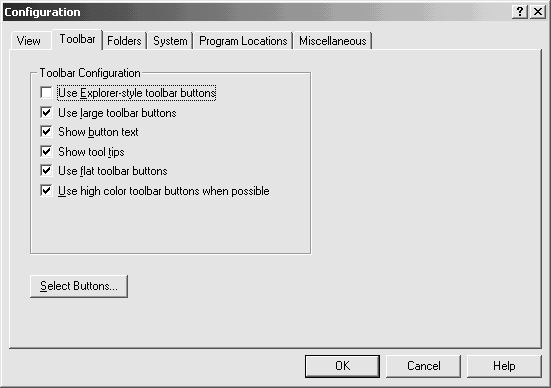
Figure 6 -3: Configuring the WinZip Classic toolbar
Click the Select Buttons button at the bottom of the screen to add or
remove icons on the WinZip Classic toolbar, as shown in Figure 6- 4.
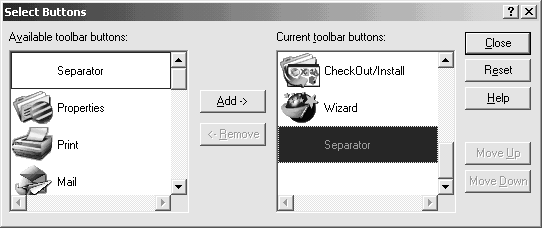
Figure 6 - 4: Adding or removing icons on the WinZip Classic toolbar
To add an icon to the toolbar, select it from the Available toolbar buttons list and click Add. To remove a toolbar icon, select it from the Current toolbar buttons list and click Remove. The list of icons on your toolbar will match the list in the Current toolbar buttons window.
To change the location of a toolbar icon, select it and click the Move Up or Move Down button. This moves the icon up or down in the list, which in turn determines where the icon appears on the WinZip toolbar. Click the Close button when you've finished making your changes, or click Reset to return your toolbar to WinZip's original configuration.
TIP
You can also configure the WinZip Classic toolbar right from the WinZip
Classic screen. To do so, press and hold ALT and then drag a toolbar icon
to a new location on the toolbar.
Configuring Folder Options
The Folders property sheet lets you specify any of six default file
locations used by various WinZip features, as shown in Figure 6-5.
- Start-up folder. Sets the folder that WinZip uses when it opens or creates Zip files. You can choose System default (usually the WinZip folder), Last open archive (the folder used to open the last archive), or Folder (any folder that you specify).
- Extract folder. Sets the folder that WinZip uses as the default folder for archive extractions. You can choose Open archive folder (the folder that contained the archive), Last extract folder (the last folder used to extract an archive), or Folder (any folder that you specify).
- Add folder. Sets the folder that WinZip uses by default when adding files to an archive. You can choose Open archive folder (the folder that holds the archive), Last add folder (the last folder used by Add), or Folder (any folder that you specify).
- Working folder. Sets the folder that WinZip uses by default when creating temporary Zip files. Temporary files are created by WinZip when performing an operation and are deleted once the operation is completed. Unless you specify a folder, WinZip will use the folder where the current archive resides. (Select the Use for Removable media only option to restrict the use of this option to removable disks, such as floppies.)
- CheckOut base folder. Sets the folder that WinZip uses by default as the parent folder for CheckOut operations. WinZip copies the contents of an archive to this folder temporarily so that you can examine it. Once you have finished checking the files, WinZip deletes the temporary files. If you do not specify a folder, WinZip uses the folder that contains the archive. More information about the checkout operation is available in Chapter 5, "Working with the Files in Your Archives."
- Temp folder. Sets the folder that WinZip uses by default when creating temporary files. WinZip creates temporary files for a number of WinZip operations, such as virus scanning. For example, when you run a virus scan, WinZip extracts the files in an archive to this folder, runs your antivirus scanner on them, and then deletes them from the folder.
By default, WinZip uses the same folder as both its working folder and temporary folder. There really is no need to change this because these two folders are essentially the same thing. However, for some operations involving floppy disks, WinZip will try to store temporary folders on the floppy disks, which can cause problems if the floppy runs out of space. Using the Working folder Use for removable media only option lets you to tell WinZip where to place temporary files to avoid running out of space on a floppy disk.
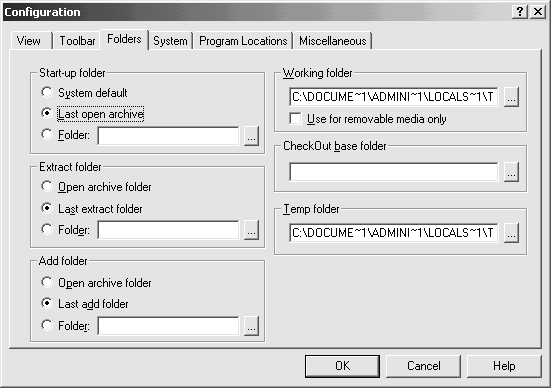
Figure 6 -5: Configuring WinZip folders
NOTE Configuring System Settings
The System property sheet, displayed in Figure 6- 6, is divided into three
sections: General, Show Add dialog when dropping files on, and Explorer
Shell Extension. The General section allows you to control the types of
archive files WinZip works with and where shortcuts to WinZip are placed.
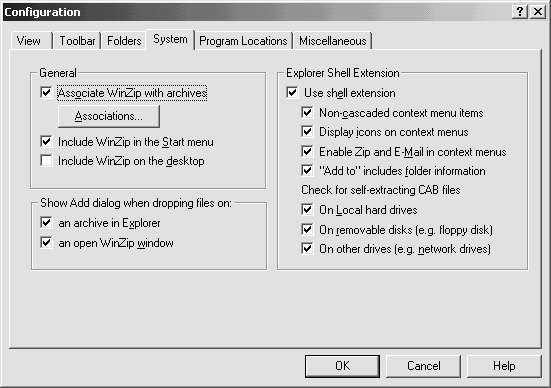
Figure 6 - 6: Configuring WinZip system settings
Associate WinZip with archives.
Configures Windows to use WinZip as the
default application for working with archives. The Associations button
opens the WinZip Associations screen, shown in Figure 6-7. By default all
listed archive types are selected. Clearing an archive's selection removes
WinZip as the registered Windows application associated with that archive
file type, but unless you have a specific reason to do so, you should not
remove any of these associations.
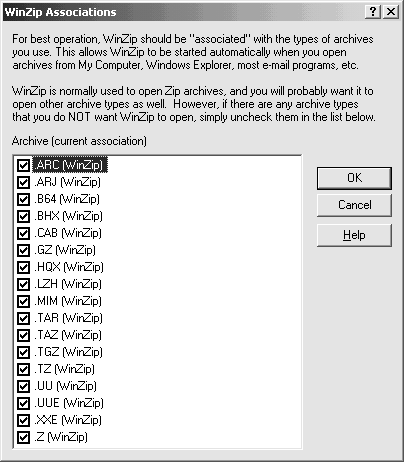
Figure 6 - 7: Managing WinZip associations with different archives
Include WinZip in the Start menu.
Adds an entry for WinZip on the Windows
Start menu.
Include WinZip on the desktop.
Places a WinZip shortcut on the Windows
desktop.
The section Show Add dialog when dropping files
on
Offers two options for
controlling what WinZip does when you drag and drop a file on an archive:
-
1. An archive in Explorer. Determines whether the Add dialog box appears when
you drop a file on an archive in Windows Explorer or the Windows desktop.
If this option is checked, the Add screen appears. For example, if you
drop a file on a Zip file's icon and this option is enabled, the WinZip
Add screen appears. You can then configure any of WinZip Add screen's
options as discussed in Chapter 4 and click Add to add the file to the Zip
file.
2. An open WinZip window. Determines whether the Add dialog box appears when you drop a file on an open WinZip window. If this box is checked, the Add screen appears.
The Explorer Shell Extension section provides several configuration options that affect the integration of WinZip features with Windows.
-
1. Use shell extension. Enables WinZip Explorer context menus and provides
support for WinZip drag-and-drop operations. This option controls whether
the other options in the Use shell extension section are enabled.
2. Non-cascaded context menu items. Allows WinZip to display submenu items on context menus. For example, right-click a file, and you will see a number of WinZip options on the file's context menu. If you disable this option, those options will disappear.
3. Display icons on context menus. Tells WinZip to add a small WinZip icon to each WinZip context menu. This option makes it easier to find Windows context menu options.
4. Enable Zip and E-mail in context menus. Determines whether the Zip and E- mail options appear in the context menu when you right-click a file.
5. "Add to" includes folder information. Tells WinZip to add folder information for files in the current folder as well as in subfolders when you add files to a Zip file by right-clicking it and selecting an Add to zip context menu option.
6. On local hard drives. Tells WinZip to check to see whether an .exe file is a self-extracting CAB file when displaying a context menu for a file on a local hard disk.
7. On removable disks (e.g., floppy disk). Tells WinZip to check to see whether an .exe file is a self-extracting CAB file when displaying a context menu for a file on a floppy disk.
8. On other drives (e.g., network drives). Tells WinZip to check to see whether an .exe file is a self-extracting CAB file when displaying a context menu for a file on a network disk.
Setting Up Connections to External
Programs
Use the Program Locations property sheet, shown in Figure 6-8, to
configure the way that WinZip interacts with a number of other programs.
Although none of these programs is required for normal WinZip use, each
extends WinZip's capabilities. These are the program associations
available:
-
1. Viewer. Specifies the location of a viewer application, such as the
Windows Quick- View program, which lets you view certain files quickly
without launching their original application.
2. Make .EXE. Sets the location of the program to be used to create self- extracting archives. The default setting is the location of WinZip Self- Extractor Personal Edition. For more information on creating self- extracting Zip files, see Chapter 5, "Working with the Files in Your Archives."
3. Scan program. Specifies the location of your antivirus program.
4. Parameters. Specifies parameters, or instructions passed to your antivirus program that tell it how you want it to run when WinZip asks it to scan the contents of an archive. WinZip will automatically configure this field if you are running one of WinZip's supported antivirus programs (discussed in Chapter 5, "Working with Archive Contents") when WinZip is installed. If you use an unsupported antivirus program, see its documentation to determine which options it requires to run from the command line. For example, the parameter %d can be used to pass the drive and folder of the files to be scanned. (See WinZip help for additional information on supported parameters.)
5. Run minimized. Prevents your virus scanner's screen from appearing when running a virus scan. If you disable this option, your antivirus program will open when WinZip runs, and you will have to close it manually once it completes its scan. This option works with the Parameters option.
6. ARJ. Sets the location of the ARJ program, an optional, third-party compression program that allows WinZip to manage .arj archives.
7. LHA. Sets the location of the LHA program, an optional, third-party compression program that allows WinZip to manage .lha archives.
8. ARC. Sets the location of the ARC program, an optional, third-party compression program that allows WinZip to manage .arc archives.
For more information on ARJ, LHA, and ARC archives, see Chapter 1, "WinZip
Basics."
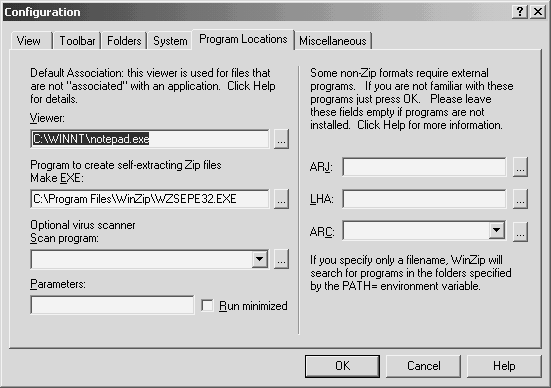
Figure 6 -8: Configuring support for external programs
Miscellaneous WinZip Configuration
Settings
The Miscellaneous property sheet contains two collections of settings, as
shown in Figure 6- 9. The first collection, in the Start-up section,
includes these options:
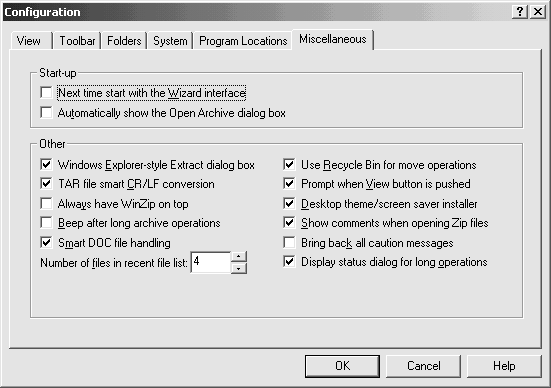
Figure 6 -9: Setting miscellaneous WinZip configuration options
-
1. Next time start with the Wizard interface. Tells WinZip to load the WinZip
Wizard when WinZip starts.
2. Automatically show the Open Archive dialog box. Tells WinZip to automatically open the Open Archive screen when WinZip starts.
3. The second collection of settings, displayed under the heading Other, covers a wide range of WinZip options.
4. Windows Explorer-style Extract dialog box. Tells WinZip to use a Windows Explorer-style interface. When this option is unchecked, WinZip displays files and folders using a Windows 3.1 File Manager-style view. Use this option if you prefer the look and feel of the old-style Windows 3.1 File Manager.
5. TAR file smart CR/LF conversion. Tells WinZip to translate TAR files so that character return and line-feed codes are properly interpreted. A TAR file is a type of archive used on UNIX systems. If you work with TAR files and leave this option disabled, some TAR files will be displayed as a continuous line of text. Turning this option on restores character return and line-feed codes so that the file is displayed as originally formatted.
6. Always have WinZip on top. Prevents other applications from sitting on top of WinZip on your screen.
7. Beep after long archive operations. Tells WinZip to beep when completing any operation that takes more than 1 second to complete. This option comes in handy when you have a very large archive, say 100MB, and want to work with another application while WinZip unzips it. You'll know WinZip is done when you hear the beep.
8. Smart DOC file handling. Tells WinZip to open all ASCII text files with a .doc file extension using its built-in viewer. If this option is not selected, WinZip will open the file in the associated application.
9. Number of files in recent file list. Displays a value between 0 and 9 specifying the number of recent archives WinZip keeps in its recently used files list on the File menu.
10. Use Recycle Bin for move operations. Tells WinZip to place a copy of any moved archive in the Windows Recycle Bin.
11. Prompt when View button is pushed. Tells WinZip to display a list of viewers when the View button in WinZip Classic is clicked. For more information on working with the View options, see Chapter 5, "Working with the Files in Your Archives."
12. Desktop theme/screen saver installer. Enables WinZip's theme and screen saver installer, which gives WinZip the ability to install any Windows theme or screen saver found in Zip files.
13. Show comments when opening Zip files. Tells WinZip to automatically display comments, if present, when opening a Zip file. Sometimes the creator of a Zip file may have some information to share regarding a Zip file such as a description of its contents or contact information. Leaving this option enabled allows WinZip to display comments when present whenever you open a Zip file. For more information on comments, see Chapter 5, "Working with the Files in Your Archives."
14. Bring back all caution messages. Tells WinZip to reenable any WinZip caution messages that you have disabled. Caution dialog boxes include any screen that contains a Do not display this dialog in the future option, such as the dialog box that appears when you start WinZip using the WinZip Wizard and then close it using WinZip Classic.
15. Display status dialog for long operations. Tells WinZip to display a progress indicator screen during lengthy operations. This screen resembles the dialog boxes that you see when copying or moving Windows files and will automatically disappear when the WinZip operation completes.
Password Protecting Archives
To protect individual files in an archive, you can password protect them.
When you do, the file will be encrypted so that people with access to your
archive will still be able to view its contents, but they will be prompted
for the password when trying to open a password-protected file. WinZip
identifies password-protected files with a + sign at the end of the file's
name.
You can password protect files only as you add them to a Zip files. To password protect a file already in an archive, extract the file and then add it back to the archive with password protection.
To password protect archive files, follow these steps:
-
1. Open an archive; then click the Password option on the Options menu.
The Password screen appears as shown in Figure 6-10.
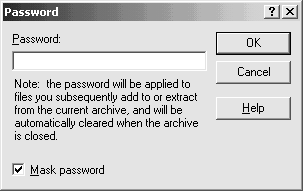
Figure 6 -10: Protecting archive files with a password
2. Type your password and make sure that the Mask password option is
selected so that no one can see your password as you type it. Click OK
3. When prompted, retype the password.
4. Now add the new file to the archive. Each file that you add will be
encrypted.
If you close a password-protected archive and then reopen it to add more files, those files will not be encrypted unless you repeat the password- protection procedure.
Sorting Archive Contents
To configure the way that files are displayed in the main WinZip Classic
display area, specify a sort order. To sort based on any column heading,
select the Sort option on the Options menu and then select a column name,
as shown in Figure 6-11.
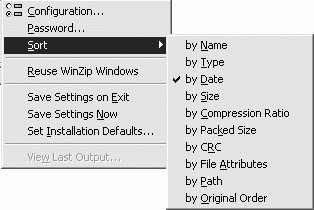
Figure 6 -11: Specifying the default sort order
You can sort on any column regardless of whether it is displayed.
Running More Than One Copy of WinZip
You can set up WinZip so that it will allow you to run only one copy at a
time or as many copies as you want. Choose between these options by
selecting or clearing the Reuse WinZip Windows option on the Options menu,
as shown in Figure 6-12. When this option is selected, you can open
multiple copies of WinZip simultaneously.
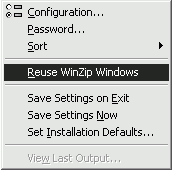
Figure 6 -12: Determining whether to permit multiple instances of WinZip
Viewing the Previous WinZip Operation
The last entry on the WinZip Options menu is the View Last Output option
(dimmed in Figure 6-14), which gives access to a description of the
results of the most recently run WinZip command, as shown on the View Last
Output screen in Figure 6-13.
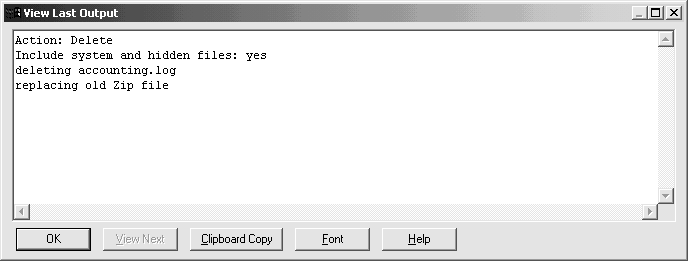
Figure 6 -13: Reviewing the results of your last WinZip command
For example, Figure 6-13 shows that the last action WinZip performed was a delete operation. In this example, a file stored in an archive was removed. The first two lines show that the user chose to include any system or hidden files when executing the Delete command. However, as the third line shows, only one file, accounting.log, was actually deleted. The last line shows that the archive was then saved (or replaced).
Saving Configuration Settings
WinZip give you two options for saving configuration changes: Save
Settings on Exit and Save Settings Now. The first option waits until you
close WinZip to save the changes, and the second saves them immediately.
WinZip also makes it easy for you to restore all configuration options to
their original settings with the Set Installation Default option. All
three of these options are located on the WinZip Classic Options menu, as
shown in Figure 6-14.
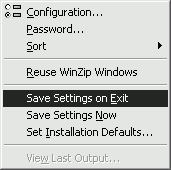
Figure 6 -14: Managing WinZip configuration
For more information on making the most out of file compression and archive management with WinZip, pick up a copy of The Book of WinZip ($14.95) from www.nostarch.com.
Jerry Lee Ford, Jr. is the author of six other books including Learn
JavaScript In a Weekend. An educator and IT Professional for over 13
years, Ford has an MBA and is a Microsoft Certified Engineer.